Focus on the Sample Surface
If it is your first time operating the microscope, we recommend that you first image the calibration sample (a 10 µm-pitch grid of 200 nm step height) provided with the instrument. Load the sample you will image (see Load/Unload Sample for guidance).
Once the sample is in place, you must focus the optics on the sample surface:

|
- Click the Navigate icon in the Workflow Toolbar.
|

|
- Focus on the surface by clicking the Sample icon in the Focus Sample panel of the Navigate view. This is the default selection. For certain sample types you may need to select the Tip Reflection button to focus on the tip reflection instead of the sample surface. This is sometimes necessary for highly reflective or featureless samples.
|
| |
- Focus on the sample surface either with the Focus: Z Motor arrows, or by rolling the trackball up or down while pressing the bottom-left button. This adjustment raises or lowers the vertical engage stage on which the SPM and optics are mounted.
|

| |
To move long distances hold both left trackball buttons down simultaneously and roll the trackball with high speed to lock the peak speed of motion. Release these two buttons to stop the motors. Be careful when performing this in the downward direction.
|
CAUTION: Because the command Focus: Z Motor Down arrow button moves the scanner vertically, be careful when making this adjustment to ensure that the tip does not hit the sample surface.

|
If you are using an appropriate probe and have enabled Smart Engage, you can also use the Find Surface button to quickly focus on the sample surface. See Engage, Scan, & Withdraw for more information. |
You can now use the XY Control buttons to navigate to the area of the sample you wish to scan:
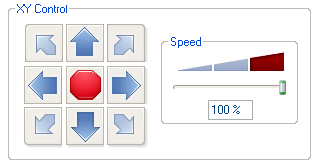
HINT: You can also double click on the video panel to move the probe tip over an area of interest in the field of view.
Previous Steps:
- Select Experiment
- Prepare and Load the Probe Holder
- Install the Probe Holder on the SPM Scanner
- Identify the Probe
- Align the Laser
- Adjust the Photodetector
- Locate the Tip
Next Steps:
- If your experiment involves TappingMode, you must now Tune the Cantilever before proceeding to the next step. If you are running a Contact Mode application, continue to Check Initial Scan Parameters.
- Engage, Scan, & Withdraw
| www.bruker.com
|
Bruker Corporation |
| www.brukerafmprobes.com
|
112 Robin Hill Rd. |
| nanoscaleworld.bruker-axs.com/nanoscaleworld/
|
Santa Barbara, CA 93117 |
| |
|
| |
Customer Support: (800) 873-9750 |
| |
Copyright 2010, 2011. All Rights Reserved. |
Open topic with navigation